
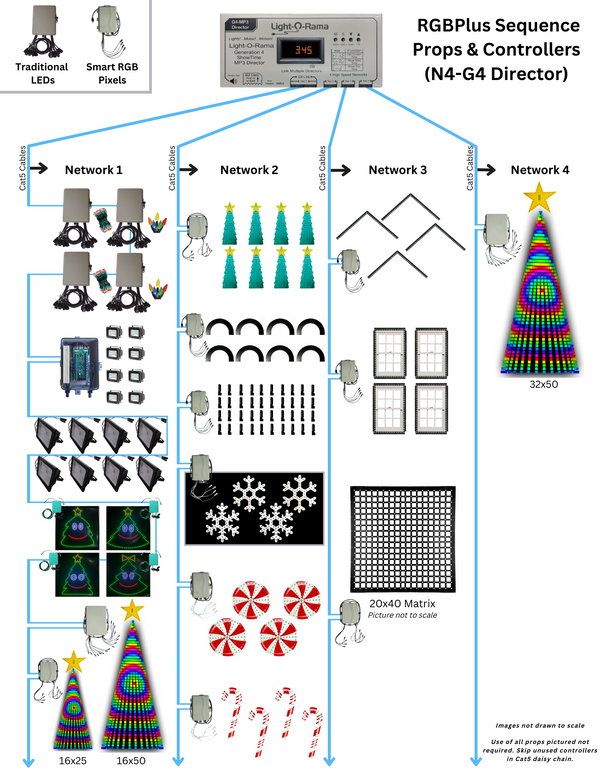


For non-modified use with RGBPlus sequences, the controller in this package must be connected to Network Aux A/Network 2. Each network in your show requires a USB485-HS Adapter (computer show) or an available port of a Showtime Director.
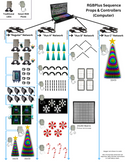
Our "CPC" packages include the "Coro, Pixels, and Controller" you need to easily add smart pixel props into to your display. These packages can be connected to an existing network of Gen3 Light-O-Rama Controllers, or used on a separate network within the same show. A Cat5 cable is required to connect this controller to existing controllers in a multi-controller network, or a computer/showtime director if it is the only Unit in the show.
S5.6.8 or higher is recommended for easiest use; a Pro license level is required to use Pixel Motion Effects.
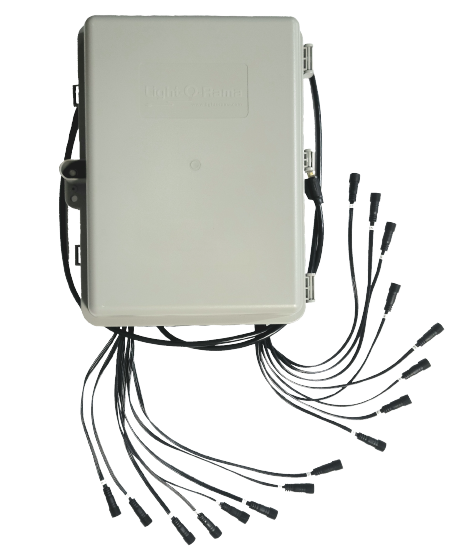
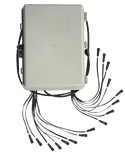
The Assembled Pixie16 controller includes the controller board and power supply wired and mounted in a weather-proof, ventilated and UL listed enclosure. The power supply is UL listed: MeanWell RSP-500-12 - 120/240V input - 12V - 41.7A output - with Power Factor Correction and extend temperature operating range. This is a 12 Volt controller system compatible with 12V RGB smart pixel strands and devices. Dumb RGB devices or standard LED / Incandescent lights cannot be plugged into the ports of this controller.
Included in this Package:
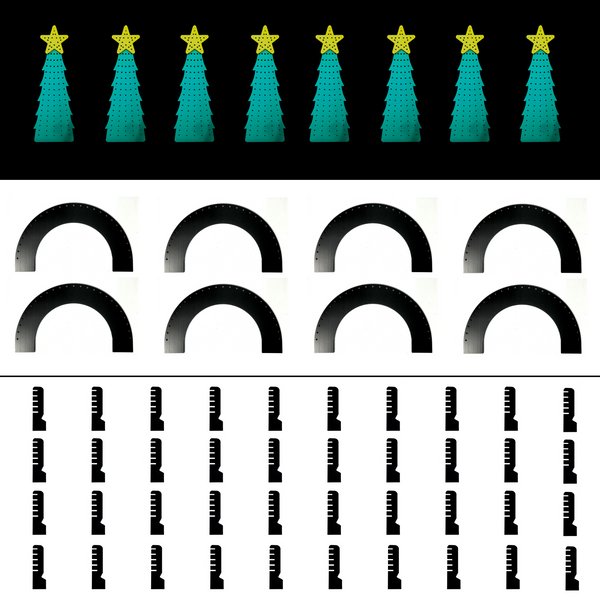
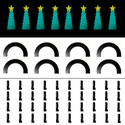
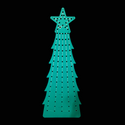
- 8 Mini Trees - 100 Nodes Each. 80 Nodes for Tree and 20 Nodes for Star. "Pixel Path" for pixel pushing included on the back of each prop. (Ports 1-8; one tree per port)
- 46" high by 17.5" wide
- 10mm Green Coro with additional Yellow Coro for Star
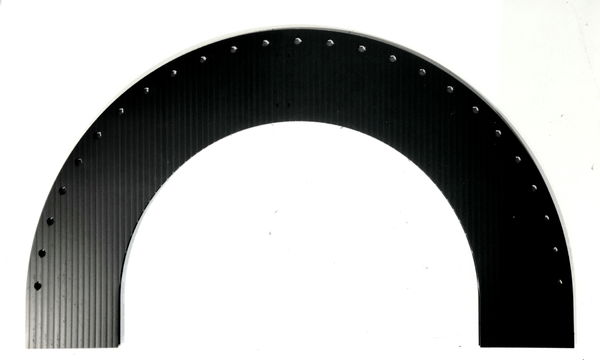
- 8 Mini Arches - 25 Nodes Each (Ports 9-12; two arches per port)
- 2' 11.5" long by 1' 8.75" high. Lighted length 35". Nodes at 2.125" spacing.
- 10mm Black Coro
- 40 Pixel Stakes - 5 Nodes Each. Used to create 4 rows of 10 pixel stakes each. (Ports 13-16; one row of 10 stakes per port)
- 12" tall with 1.5" spacing
- 10mm Black Coro
- 16 Strands of Black Bullet Pixels - 50 Ct (4" spacing). Two strands of 50 should be connected together per Mini Tree prop.
- 8 Strands of Black Bullet Pixels - 25 Ct (4" spacing). Two arches should be connected together per Pixie port.
- 4 Strands of Black Bullet Pixels - 50 Ct (5 node sections - 3 feet of spacing between each set of 5 nodes.)
- Pixie16 Controller - Assembled -12V - With LOR Dangles Included (Black)
Optional Additions:
- 16 Pixel Extensions - Black (5ft, 10ft, 15ft, or 25ft)
- Cat5 Cable (10ft, 25ft, 50ft, or 100ft)
Not Included:
- Mounting material for home attachment
- Metal stakes or other ground mounting material
Our CPC packages can be used in a display with custom sequencing as long as the controller's Unit IDs do not conflict with any other Unit ID assignments on the network, and network limits have not been exceeded. To customize your prop combinations in your custom sequenced display, visit our collection of Prop Packages so you can use the Pixie controller that best suits your needs.
If you want duplicates of the props in this package but still want to use our RGB Plus Sequences, just put multiples of this kit into your cart and make sure each Pixie controller uses the SAME Unit IDs when you set up your display. Read more about our sequences in the RGBPlus Sequence tab.
Package Assembly
Pixels are not pre-pushed. Assembly is to be completed by the customer.
When viewing the Mini Tree from the back, the Pixel Path "star" (for "start") should be at the bottom right of the prop, with the pixel path continuing up and down the tree until it continues into the star and reaches the "square" for "stop." When viewing the Mini Trees as the audience, the first tree should be on the left.
When viewing the arch from the back, the first pixel should be on the right and the 25th pixel should end on the left. If viewing the prop from the front (no visible wires), the first pixel of each arch should start on the left. When viewing the display as the audience, the first of the 8 arches should be on the left and the last arch should be on the right.
The first node of each set of 5 pixels in a pixel stake should start at the bottom of the pixel stake, and the 5th node should end at the top. When creating your 4 rows of 10 pixel stakes, the first stake in each group of 10 should be on the left side of the row when viewing from the audience vantage point. Row 1 should be closest to your audience, and Row 4 should be farthest from your audience.
Mount the props to your home or in your yard using standard ground stakes, zip ties, PVC or other mounting material of your choice.
What can your display look like with our CPC Packages? Take a look!
Adding more than 40 Pixel Stakes in your display:
Our default RGBPlus sequences have effects for 40 Pixel stakes. If you do not want to edit the preview/sequences and would prefer that everything just work 'out of the box,' DO NOT order more than one set of 40 pixel stakes with a controller.
If you feel comfortable modifying your custom preview or a copy of the RGBPlus preview (we do not recommend editing the default), you can download one of these prop files and import it instead of the default CPC Pixel Stake Package from the Light-O-Rama Props online menu, then use "Assign Different Preview" to map the RGBPlus sequence to your preview with additional stakes. We do not recommend connecting more than 20 stakes (100 pixels) per pixie port due to the extended wire length of the special pixels made for these stakes - you may see voltage drop if you connect more than 100 pixels.
80 Pixel Stakes - 20 stakes (100 pixels) per controller port. 4 ports of a Pixie used in total.
120 Pixel Stakes - 20 stakes (100 pixels) per controller port (4 needed) on PixieA. 10 stakes (50 pixels) per controller port (4 needed) on PixieB. Default settings for PixieB have the Unit IDs set at 50, 51, 52, and 52 on Aux A. You can change these Unit IDs to a different set of four consecutive numbers if needed. 8 Pixie ports are used in total.
160 Pixel Stakes - 20 stakes (100 pixels) per controller port (4 needed) on PixieA. 20 stakes (100 pixels) per controller port (4 needed) on PixieB. Default settings for PixieB have the Unit IDs set at 50, 51, 52, and 52 on Aux A. You can change these Unit IDs to a different set of four consecutive numbers if needed. 8 Pixie ports are used in total.

