
Unit IDs - Testing Page
What Are Unit IDs?
Light-O-Rama controllers are connected to a data network for communications. In typical configurations, the controllers are daisy-chained, one after the other, in a line. To receive their lighting commands, each controller requires a unique identifier called a Unit ID.
Your Unit ID assignments must match in both the Sequencer AND on the physical controller in order for your sequences to play.
Hexadecimal Numbering
Unit IDs use hexadecimal, a numbering system with 16 digits instead of 10 (Base 16). After 9, it continues with the letters A through F, then moves on to 10. A run of Unit IDs looks like this:
01, 02, 03, 04, 05, 06, 07, 08, 09, 0A, 0B, 0C, 0D, 0E, 0F, 10, 11
This means 10 is the sixteenth Unit ID, not the tenth. Jump to the full Unit ID table → to see all available IDs on a LOR network.
Controllers with Multiple IDs
Every controller has at least one Unit ID. Some controllers use a single ID. Pixel controllers use a block of consecutive IDs, up to 32 per controller.
You only set the first ID. The first ID acts as the controller’s name, and the remaining IDs are assigned automatically in order. For example, a Pixie8 set to start at 09 uses 09, 0A, 0B, 0C, 0D, 0E, 0F, and 10.
In 2026, we introduced the concept of Double Unit IDs to expand the capacity fo Pixie Controllers. Learn more →
Setting a Unit ID
Unit IDs on each controller must be set to receive their correct lighting commands. All controllers ship with a default ID of 01, so any additional controllers on your network will need a new one. How you set the ID depends on your controller type.
| Method | How it works | Used by |
|---|---|---|
| Hardware Utility | Set from your computer through a USB485 adapter | CTB16PC, Cosmic Color bulbs, pixels, ribbons, and floods |
| DIP or rotary switches | Set by hand on the controller board, no computer needed | Pixie controllers (recommended), CTB04PC, CMB24D, CTB16 professional |
| Front panel | Set with the LCD and buttons on the controller | LOR160x, LOR800Wg3, CTB32LDg3 |
Not sure which applies to your controller? See the full controller list below →
Before you Start:
- Use one method per controller. If any DIP switch is ON, the controller returns to its switch setting every time it powers up, even if you set a different ID from your computer. To set an ID from your computer, turn all DIP switches OFF. A common cause of an ID that keeps resetting is the 8th switch left ON, which sets the ID to 01.
- Power the controller off before changing DIP switches. Changes won’t take effect while it’s powered.
Set via Hardware Utility
Connect the controller to your computer with a USB adapter, then use the Control Panel's Hardware Utility to find it and assign its ID. [Steps to add]
Set via DIP or rotary switches
ON is up and OFF is down. Match the switch positions to the ID tables below: 8 switches on Pixie controllers, 12 on the CTB04PC and CMB24D. [Add rotary dial steps]
Set via front panel
Use the buttons and LCD on the controller to enter the ID. See your controller’s manual for the exact steps.
For any controller not listed here, check the product manual →.
Setting Other Devices?
Devices like the Aurora Core, Pixielink and others are set using their web page. View their product manual for details.
What Unit ID do I set my controller to?
- If you're using one of our default previews (RGBPlus or Pixel Bright), you must match the preview's ID settings.
- If you're using a custom preview, there's no right or wrong way to set IDs, though it's best to organize your unit IDs sequentially. You can put up to 240 IDs per network. If you reach the capacity of your network, start with a second network.
Configuring a CPC Package? Use the package default IDs found in your Quick Guide. Unit IDs must match your Preview. Visit the RGB Plus or Pixel Bright page for the correct setting.
Dip switch calculator(block)
Setting the Controller Unit ID
How to make each controller unique for sequencing
Light-O-Rama controllers are connected to a data network for communications. In typical configurations, the controllers are daisy-chained so each requires a unique Unit ID. How that unique Unit ID is assigned depends on the type of controller. Here's how our most common controller families have their IDs set:
- CTB16PC = Hardware Utility Program (Connect to Computer via USB485 Adapter)
- LOR160x = Front LCD Panel on Controller
- CMB24D = 12 DIP Switches on Controller Board (see table at bottom of this page)
- Pixie Controllers = DIP Switches (Recommended), OR Hardware Utility Program/USB Adapter (only use ONE method)
- Aurora Core Controller = Webpage interface
Here's what DIP Switches look like on a Pixie Controller
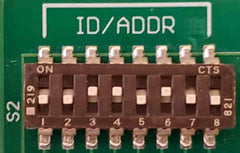
For an in depth look at all of our products and how to set the IDs, see the chart below. The instruction manual for the controller is also an excellent source for how to configure your controller.
If you need the DIP switch table for Pixie Controllers, are trying to configure a CPC Package for use with an RGBPlus sequence, or the last 6 ports on your Pixie16 "aren't working:"
Click Here to Jump to the Unit ID Table and Learn How to Set a Pixie's Unit ID
Cosmic Color Bulbs/Pixels/Floods/Ribbons |
Set Unit ID via Hardware Utility |
Set Unit ID via front panel |
Set Unit ID via board DIP/rotary switches |
|
|
CCB-100 |
Cosmic Color Bulbs using latest available firmware. |
 |
||
|
CCP-100 |
Cosmic Color Pixels using latest available firmware. |
|
||
|
CCR-150 |
Cosmic Color Ribbon using latest available firmware. |
|
||
|
High-Power-RGB-Flood-50W |
Cosmic Color Flood using latest available firmware. |
|
||
Pixel Controllers |
via Hardware Utility |
via front panel |
via board DIP switches |
|
|
CMB24D |
8 pixel controller board using latest available firmware. |
|
||
|
PixCon16 |
16 SPI ports and 4 DMX-512 ports, each with 340 pixel addressability using latest available firmware. |
set via Advanced Configuration | ||
|
Pixie2 |
2 SPI ports, each with 100 pixel addressability using latest available firmware. |
if all DIP switches off
|
|
|
|
Pixie4 |
4 SPI ports, each with 100 pixel addressability using latest available firmware. |
if all DIP switches off
|
|
|
|
Pixie8 |
8 SPI ports, each with 100 pixel addressability using latest available firmware. |
if all DIP switches off
|
|
|
|
Pixie16 |
16 SPI ports, each with 100 pixel addressability using latest available firmware. |
if all DIP switches off
|
|
|
DC Controllers |
via Hardware Utility |
via front panel |
via board rotary dials |
|
|
CMB16D |
16 channel DC controller board using latest available firmware. |
|
||
Digital I/O |
via Hardware Utility |
via front panel |
via board rotary dials |
|
|
DIO32 |
Digital I/O motherboard and daughter boards using latest available firmware. |
|
||
DMX Bridge |
via Hardware Utility |
via front panel |
via board DIP/rotary switches |
|
|
idmx1000 |
DMX-512 bridge to Light-O-Rama data network using latest available firmware. |
|
||
Servo Control |
via Hardware Utility |
via front panel |
via board DIP/rotary switches |
|
|
ServoDog |
ServoDog servo controller board using latest available firmware. |
|
||
CTB04PC/CTB16PC Residential High Voltage AC Light Controllers |
via Hardware Utility |
via front panel |
via board DIP switches |
|
|
CTB04PC |
Residential Generation 3, 4 channel controller using latest available firmware. |
|
||
|
CTB16PCg3 |
Residential Generation 3, 16 channel controller using latest available firmware. |
|
||
|
CTB16PC |
Residential 16 channel V2 controller boards. |
|
||
|
CTB16PC-Kit |
Residential 16 channel kit built controller boards. |
|
||
CTB16/32/LOR8xx/LOR16xx Professional High Voltage AC Light Controllers |
via Hardware Utility |
via front panel |
via board rotary dials |
|
|
CTB16 blue |
Professional 16 channel blue controller V7 controller board. Latest firmware version. if your board already has firmware version 4.40 or higher then it cannot use version 4.30 or lower. |
|
|
|
|
CTB16 green |
Professional 16 channel green controller board using latest available firmware. |
|
|
|
|
CTB32LDg3 |
Professional Generation 3, 16 channel commercial controller board using latest available firmware. |
|
|
|
|
LOR160x |
Professional 16 channel commercial controller (metal box) using latest available firmware. |
|
|
|
|
LOR160xWG3 |
Professional Generation 3, 16 channel commercial controller (metal box) using latest available firmware. |
|
|
|
|
LOR800Wg3 |
Professional Generation 3, 8 channel commercial controller for LOR800Wg3 (metal box) using latest available firmware. |
|
|
|
See the appropriate product manual for how to set other unit IDs. The manual will also discuss what the other switches are for.
Setting the Unit ID via DIP switches on controllers with 8 Switches (Pixie16, Pixie8, Pixie4, etc)
With Pixie controllers, each port on the controller gets its own Unit ID or DMX Universe, but you only need to tell the controller what the FIRST port is assigned to, then it will automatically assign the rest. When you look for a Pixie controller in the Hardware Utility, the "name" of the controller will have the FIRST Unit ID of the Unit - remember that there are more numbers assigned to each.
Pixie2 = 2 Unit IDs/DMX Universes
Pixie4 = 4 Unit IDs/DMX Universes
Pixie8 = 8 Unit IDs/DMX Universes
Pixie16 = 16 Unit IDs/DMX Universes
We recommend setting the Unit ID of a Pixie controller using the DIP Switches located on the physical controller board (see picture below). You controller does NOT need to be connected to a computer.
Take a look at the picture below for an example Pixie8 controller set to start at Unit ID 40 (the ID our 6'6" Pixel Tree needs to start with to work with our store sequences). "ON" is up and "OFF" is down. Turning any DIP switch on means the controller's ID can no longer be set with the computer - it will revert to the Unit ID setting of the DIP switches every time its repowered. To set the Unit ID of a Pixie with your computer, ensure all DIP switches are turned OFF. It is easier to set the ID with the DIP Switches, NOT the computer. You cannot set it using both methods at once.
A common problem is that the 8th DIP switch is left in the 'on' position (which sets the Pixie start at Unit ID 01), then trying to change the Pixie to start at another ID using a computer. The ID will revert to the DIP Switch's directions (01), every time you remove power from the Pixie. Turn all DIP Switches off to set the ID with a computer, or ensure the DIP switches are at the correct number (not 01).

LOR Unit IDs include 6 additional hexadecimal assignments in every normal set of 01 through 10. This means that a Pixie16 controller with a starting ID of 01 will use the following Unit ID assignments for its 16 ports:
01, 02, 03, 04, 05, 06, 07, 08, 09, 0A, 0B, 0C, 0D, 0E, 0F, 10
NOT
01, 02, 03, 04, 05, 06, 07, 08, 09, 10, 11, 12, 13, 14, 15, 16
Your Unit ID assignments must match in both the Sequencer AND on the physical controller in order for your sequences to play. Take a look at the table below to make sure your controller's DIP switch settings are correct. a "1" means the switch should be in the "on" position and a "0" means the switch should be "off."
The Pixie controller must be disconnected from power when you change DIP Switches. If the controller is powered, the change will NOT take effect.
|
LOR ID |
Switches 1‐4 |
Switches 5-8 |
|
LOR ID |
Switches 1‐4 |
Switches 5-8 |
|
LOR ID |
Switches 1‐4 |
Switches 5-8 |
|
01 |
0000 |
0001 |
|
11 |
0001 |
0001 |
|
21 |
0010 |
0001 |
|
02 |
0000 |
0010 |
|
12 |
0001 |
0010 |
|
22 |
0010 |
0010 |
|
03 |
0000 |
0011 |
|
13 |
0001 |
0011 |
|
23 |
0010 |
0011 |
|
04 |
0000 |
0100 |
|
14 |
0001 |
0100 |
|
24 |
0010 |
0100 |
|
05 |
0000 |
0101 |
|
15 |
0001 |
0101 |
|
25 |
0010 |
0101 |
|
06 |
0000 |
0110 |
|
16 |
0001 |
0110 |
|
26 |
0010 |
0110 |
|
07 |
0000 |
0111 |
|
17 |
0001 |
0111 |
|
27 |
0010 |
0111 |
|
08 |
0000 |
1000 |
|
18 |
0001 |
1000 |
|
28 |
0010 |
1000 |
|
09 |
0000 |
1001 |
|
19 |
0001 |
1001 |
|
29 |
0010 |
1001 |
|
0A |
0000 |
1010 |
|
1A |
0001 |
1010 |
|
2A |
0010 |
1010 |
|
0B |
0000 |
1011 |
|
1B |
0001 |
1011 |
|
2B |
0010 |
1011 |
|
0C |
0000 |
1100 |
|
1C |
0001 |
1100 |
|
2C |
0010 |
1100 |
|
0D |
0000 |
1101 |
|
1D |
0001 |
1101 |
|
2D |
0010 |
1101 |
|
0E |
0000 |
1110 |
|
1E |
0001 |
1110 |
|
2E |
0010 |
1110 |
|
0F |
0000 |
1111 |
|
1F |
0001 |
1111 |
|
2F |
0010 |
1111 |
|
10 |
0001 |
0000 |
|
20 |
0010 |
0000 |
|
30 |
0011 |
0000 |
|
LOR ID |
Switches 1‐4 |
Switches 5-8 |
|
LOR ID |
Switches 1‐4 |
Switches 5-8 |
|
LOR ID |
Switches 1‐4 |
Switches 5-8 |
|
31 |
0011 |
0001 |
|
41 |
0100 |
0001 |
|
51 |
0101 |
0001 |
|
32 |
0011 |
0010 |
|
42 |
0100 |
0010 |
|
52 |
0101 |
0010 |
|
33 |
0011 |
0011 |
|
43 |
0100 |
0011 |
|
53 |
0101 |
0011 |
|
34 |
0011 |
0100 |
|
44 |
0100 |
0100 |
|
54 |
0101 |
0100 |
|
35 |
0011 |
0101 |
|
45 |
0100 |
0101 |
|
55 |
0101 |
0101 |
|
36 |
0011 |
0110 |
|
46 |
0100 |
0110 |
|
56 |
0101 |
0110 |
|
37 |
0011 |
0111 |
|
47 |
0100 |
0111 |
|
57 |
0101 |
0111 |
|
38 |
0011 |
1000 |
|
48 |
0100 |
1000 |
|
58 |
0101 |
1000 |
|
39 |
0011 |
1001 |
|
49 |
0100 |
1001 |
|
59 |
0101 |
1001 |
|
3A |
0011 |
1010 |
|
4A |
0100 |
1010 |
|
5A |
0101 |
1010 |
|
3B |
0011 |
1011 |
|
4B |
0100 |
1011 |
|
5B |
0101 |
1011 |
|
3C |
0011 |
1100 |
|
4C |
0100 |
1100 |
|
5C |
0101 |
1100 |
|
3D |
0011 |
1101 |
|
4D |
0100 |
1101 |
|
5D |
0101 |
1101 |
|
3E |
0011 |
1110 |
|
4E |
0100 |
1110 |
|
5E |
0101 |
1110 |
|
3F |
0011 |
1111 |
|
4F |
0100 |
1111 |
|
5F |
0101 |
1111 |
|
40 |
0100 |
0000 |
|
50 |
0101 |
0000 |
|
60 |
0110 |
0000 |
|
LOR ID |
Switches 1‐4 |
Switches 5-8 |
|
LOR ID |
Switches 1‐4 |
Switches 5-8 |
|
LOR ID |
Switches 1‐4 |
Switches 5-8 |
|
61 |
0110 |
0001 |
|
71 |
0111 |
0001 |
|
81 |
1000 |
0001 |
|
62 |
0110 |
0010 |
|
72 |
0111 |
0010 |
|
82 |
1000 |
0010 |
|
63 |
0110 |
0011 |
|
73 |
0111 |
0011 |
|
83 |
1000 |
0011 |
|
64 |
0110 |
0100 |
|
74 |
0111 |
0100 |
|
84 |
1000 |
0100 |
|
65 |
0110 |
0101 |
|
75 |
0111 |
0101 |
|
85 |
1000 |
0101 |
|
66 |
0110 |
0110 |
|
76 |
0111 |
0110 |
|
86 |
1000 |
0110 |
|
67 |
0110 |
0111 |
|
77 |
0111 |
0111 |
|
87 |
1000 |
0111 |
|
68 |
0110 |
1000 |
|
78 |
0111 |
1000 |
|
88 |
1000 |
1000 |
|
69 |
0110 |
1001 |
|
79 |
0111 |
1001 |
|
89 |
1000 |
1001 |
|
6A |
0110 |
1010 |
|
7A |
0111 |
1010 |
|
8A |
1000 |
1010 |
|
6B |
0110 |
1011 |
|
7B |
0111 |
1011 |
|
8B |
1000 |
1011 |
|
6C |
0110 |
1100 |
|
7C |
0111 |
1100 |
|
8C |
1000 |
1100 |
|
6D |
0110 |
1101 |
|
7D |
0111 |
1101 |
|
8D |
1000 |
1101 |
|
6E |
0110 |
1110 |
|
7E |
0111 |
1110 |
|
8E |
1000 |
1110 |
|
6F |
0110 |
1111 |
|
7F |
0111 |
1111 |
|
8F |
1000 |
1111 |
|
70 |
0111 |
0000 |
|
80 |
1000 |
0000 |
|
90 |
1001 |
0000 |
|
LOR ID |
Switches 1‐4 |
Switches 5-8 |
|
LOR ID |
Switches 1‐4 |
Switches 5-8 |
|
LOR ID |
Switches 1‐4 |
Switches 5-8 |
|
91 |
1001 |
0001 |
|
A1 |
1010 |
0001 |
|
B1 |
1011 |
0001 |
|
92 |
1001 |
0010 |
|
A2 |
1010 |
0010 |
|
B2 |
1011 |
0010 |
|
93 |
1001 |
0011 |
|
A3 |
1010 |
0011 |
|
B3 |
1011 |
0011 |
|
94 |
1001 |
0100 |
|
A4 |
1010 |
0100 |
|
B4 |
1011 |
0100 |
|
95 |
1001 |
0101 |
|
A5 |
1010 |
0101 |
|
B5 |
1011 |
0101 |
|
96 |
1001 |
0110 |
|
A6 |
1010 |
0110 |
|
B6 |
1011 |
0110 |
|
97 |
1001 |
0111 |
|
A7 |
1010 |
0111 |
|
B7 |
1011 |
0111 |
|
98 |
1001 |
1000 |
|
A8 |
1010 |
1000 |
|
B8 |
1011 |
1000 |
|
99 |
1001 |
1001 |
|
A9 |
1010 |
1001 |
|
B9 |
1011 |
1001 |
|
9A |
1001 |
1010 |
|
AA |
1010 |
1010 |
|
BA |
1011 |
1010 |
|
9B |
1001 |
1011 |
|
AB |
1010 |
1011 |
|
BB |
1011 |
1011 |
|
9C |
1001 |
1100 |
|
AC |
1010 |
1100 |
|
BC |
1011 |
1100 |
|
9D |
1001 |
1101 |
|
AD |
1010 |
1101 |
|
BD |
1011 |
1101 |
|
9E |
1001 |
1110 |
|
AE |
1010 |
1110 |
|
BE |
1011 |
1110 |
|
9F |
1001 |
1111 |
|
AF |
1010 |
1111 |
|
BF |
1011 |
1111 |
|
A0 |
1010 |
0000 |
|
B0 |
1011 |
0000 |
|
C0 |
1100 |
0000 |
|
LOR ID |
Switches 1‐4 |
Switches 5-8 |
|
LOR ID |
Switches 1‐4 |
Switches 5-8 |
LOR ID |
Switches 1‐4 |
Switches 5-8 |
|
|
C1 |
1100 |
0001 |
|
D1 |
1101 |
0001 |
E1 |
1110 |
0001 |
|
|
C2 |
1100 |
0010 |
|
D2 |
1101 |
0010 |
E2 |
1110 |
0010 |
|
|
C3 |
1100 |
0011 |
|
D3 |
1101 |
0011 |
E3 |
1110 |
0011 |
|
|
C4 |
1100 |
0100 |
|
D4 |
1101 |
0100 |
E4 |
1110 |
0100 |
|
|
C5 |
1100 |
0101 |
|
D5 |
1101 |
0101 |
E5 |
1110 |
0101 |
|
|
C6 |
1100 |
0110 |
|
D6 |
1101 |
0110 |
E6 |
1110 |
0110 |
|
|
C7 |
1100 |
0111 |
|
D7 |
1101 |
0111 |
E7 |
1110 |
0111 |
|
|
C8 |
1100 |
1000 |
|
D8 |
1101 |
1000 |
E8 |
1110 |
1000 |
|
|
C9 |
1100 |
1001 |
|
D9 |
1101 |
1001 |
E9 |
1110 |
1001 |
|
|
CA |
1100 |
1010 |
|
DA |
1101 |
1010 |
EA |
1110 |
1010 |
|
|
CB |
1100 |
1011 |
|
DB |
1101 |
1011 |
EB |
1110 |
1011 |
|
|
CC |
1100 |
1100 |
|
DC |
1101 |
1100 |
EC |
1110 |
1100 |
|
|
CD |
1100 |
1101 |
|
DD |
1101 |
1101 |
ED |
1110 |
1101 |
|
|
CE |
1100 |
1110 |
|
DE |
1101 |
1110 |
EE |
1110 |
1110 |
|
|
CF |
1100 |
1111 |
|
DF |
1101 |
1111 |
EF |
1110 |
1111 |
|
|
D0 |
1101 |
0000 |
|
E0 |
1110 |
0000 |
F0 |
1111 |
0000 |
For DMX Settings and other specifications, please reference the Pixie manual.
Setting the Unit ID via DIP switches on controllers with 12 Switches (CTB04PC, CMB24D, etc)
It’s easy to get intimidated setting the controller Unit ID via the little on/off switches on the circuit board. The good news is it typically only has to be done once.
The manual goes into great details on how to set all the switches. Here’s a quick example.
Locate the switches on the controller. It should look like this if the controller is set for Unit ID 02.

Look carefully and orient the controller to see the switches as shown in the above image (click the picture to make it larger if needed). On one side of the switch set there’s a marking for off/on.
ON is up
OFF is down
Each little switch is marked 1-12. Using something small like a toothpick, set the switches as needed for the Unit ID required. To make it easy, we’ve created a chart showing how to set Unit ID 01-09.
| UNIT ID | SWITCH NUMBER | |||||||||||
|---|---|---|---|---|---|---|---|---|---|---|---|---|
| 1 | 2 | 3 | 4 | 5 | 6 | 7 | 8 | 9 | 10 | 11 | 12 | |
| 01 | off | off | off | off | off | off | off | off | ON | off | off | off |
| 02 | off | off | off | off | off | off | off | ON | off | off | off | off |
| 03 | off | off | off | off | off | off | off | ON | ON | off | off | off |
| 04 | off | off | off | off | off | off | ON | off | off | off | off | off |
| 05 | off | off | off | off | off | off | ON | off | ON | off | off | off |
| 06 | off | off | off | off | off | off | ON | ON | off | off | off | off |
| 07 | off | off | off | off | off | off | ON | ON | ON | off | off | off |
| 08 | off | off | off | off | off | ON | off | off | off | off | off | off |
| 09 | off | off | off | off | off | ON | off | off | ON | off | off | off |
Basic License (FREE)
Try out our software! Use up to 4 traditional AC controllers, or 680 pixels on an ELOR network, or experiment with fixtures on 1 DMX Universe.
Control real lights with our Schedule Editor or SD Card builder, and connect to our Mobile App to make live changes during playback.
Advanced License
Designed for unlimited control of AC lights, the Advanced license is perfect for drive throughs, parks, and residential homes that preserve the classic look of AC Christmas lights.
Gain access to advanced scheduling features, interactivity, video projection, and more.
Pro License
Control millions of lights and unlock every feature Light-O-Rama has to offer, including full access to our RGB Motion Effect Generator.
Use all the features in the Advanced license, plus Time Code Sync, Cue List Player, Rest API, integration with IGNITE Firing Systems, and more.
Got Your License Key?
Download software for the first time, or find the latest release.
Basic to Advanced to Pro
Upgrade to a higher license version to unlock more features. Just pay the difference.
Get the Latest Version
New major versions are released every 4-5 years. Upgrade now for only $29.95.
License Features & Comparison
Which License Level Is Right For you?
| Pricing & Upgrades | |||
|---|---|---|---|
| Basic (Free) | Advanced | Pro | |
|
Discounted in Starter PackagesOne-time price for lifetime access license (for the latest software version available at time of purchase). |
FREE
|
$139.95
| $189.95
|
|
Access to versions of S7 released within one year of most recent license purchase/upgrade.* |
Yes
|
Yes
| Yes
|
*The final version of S6 is version 6.6.12. Development of S7 was announced in April of 2026, with an estimated release date in early 2027. |
|||
| Support Access | |||
| Basic (Free) | Advanced | Pro | |
|
Video Tutorials & Online Documentation |
Included
|
Included
| Included
|
|
Zoom Room Q&A Events |
Included
|
Included
| Included
|
|
Official Facebook Group Access |
Included
|
Included
| Included
|
|
Official Forums Access |
Included
|
Included
| Included
|
|
Online Group Training Courses |
$10
|
$10
| $10
|
|
One-On-One Remote Training Sessions |
$45+
|
$45+
| $45+
|
|
Help Desk Support |
Included
| Included
| |
|
Phone Support |
Included
| Included
| |
| Networks, Unit IDs, & Pixel Counts | |||
| Basic (Free) | Advanced | Pro | |
|
LOR/ELOR Networks Supported |
1
|
16*
| 16*
|
|
LOR Unit IDs Supported |
4
|
3840*
| 3840*
|
|
Enhanced ELOR Network Protocol (Required for Smart Pixels) |
Yes
|
No
| Yes
|
|
Number of Smart Pixels Controllable with Motion Effects |
680 / 170**
|
0
| 1 Million+
|
|
DMX Universes via USB Adapter (Open DMX or Enttec Pro) |
1***
|
999
| 3000
|
|
DMX Universes via E1.31 (sACN) |
1***
|
999
| 3000
|
|
Native DMX Devices & Intensity |
Yes
|
Yes
| Yes
|
*The maximum number of allowable unique LOR/ELOR networks is 16. The maximum number of allowable unique Unit IDs across all LOR networks is 3,840. Advanced and Pro licenses have unlimited duplication use of these options. |
|||
**850 Pixels supported in total: 680 pixels via an ELOR network and 170 pixels via 1 DMX Universe. If all 4 Unit IDs are allocated for ELOR smart pixels (one Pixie4), traditional lights / dumb RGB cannot be controlled. |
|||
***Cannot use both types at the same time. Choose one or the other. |
|||
| Preview / Sequencer | |||
| Basic (Free) | Advanced | Pro | |
|
Number of Preview Layout Simulations Supported |
Unlimited
|
Unlimited
| Unlimited
|
|
Number of Custom Sequences Supported |
Unlimited
|
Unlimited
| Unlimited
|
|
Compatibility with RGBPlus / Pixel Bright Sequences |
AC Lights Only
|
AC, Floods, & Singing Faces
| Full Compatibility
|
|
Multi-Scene Previews (Multiple Houses) |
Yes
|
Yes
| Yes
|
|
Import Vendor RGB Props & Models |
Yes
|
Yes
| Yes
|
|
Keyboard Shortcuts & Custom Maps |
Yes
|
Yes
| Yes
|
|
Timing Wizards & Automatic Beat Detection |
Yes
|
Yes
| Yes
|
|
Channel Effects - On, Fade, Shimmer, Twinkle, Chase, Fill, Toggle, Intensity |
Yes
|
Yes
| Yes
|
|
Colorwash Effects (Dumb RGB / Floods) |
Yes
|
Yes
| Yes
|
|
Motion Effect Generator Use (Built in RGB Effects) |
Yes
|
No
| Yes
|
|
Audio Display |
Waveform
|
Waveform
| Waveform / Spectrogram
|
|
MIDI File Wizard |
Yes
| Yes
| |
|
Sub Sequences |
Yes
| Yes
| |
|
Protected Sequence Creation |
Yes
| Yes
| |
|
Video Playback (Use with Standard Projector) |
Full Screen
| Full Screen
| |
|
Superstar Addon Software Included |
2CCR (100 Pixels)
| ||
| Show Editor & Scheduler (Control Panel) | |||
|---|---|---|---|
| Basic (Free) | Advanced | Pro | |
|
Output to Real Lights |
Yes
|
Yes
| Yes
|
|
Day of Week / Calendar Based Show Scheduling |
Yes
|
Yes
| Yes
|
|
In-Order or Random Shuffle Playback |
Yes
|
Yes
| Yes
|
|
Show on Demand |
Yes
|
Yes
| Yes
|
|
Sunrise/Sunset Scheduling |
Yes
|
Yes
| Yes
|
|
Startup/Shutdown Sequences |
Yes
|
Yes
| Yes
|
|
Background Sequences |
Yes
| Yes
| |
|
User Interactive Shows (Triggers) |
Yes
| Yes
| |
|
Execute Windows Shell Commands |
Yes
| Yes
| |
|
Cue List Player (S6 only) |
Yes
| ||
|
Show Player Timecode Leader/Follower {SMPTE/Art-Net} (S6.3.10+ Only) |
Yes
| ||
|
Rest API and Open Sound Control (S6.2.4+) |
Yes
| ||
|
Integration with Ignite Firing Systems (Fireworks) (S6.3.16+) |
Yes
| ||
| Utility Programs & Mobile App | |||
| Basic (Free) | Advanced | Pro | |
|
Hardware Utility (Configuration & Firmware Updates) |
Yes
|
Yes
| Yes
|
|
Real-time Light Testing Console |
Yes
|
Yes
| Yes
|
|
Load Standalone Sequence to Controller (No music, no Motion Effects) |
Yes
|
Yes
| Yes
|
|
MP3 Director Show Builder (SD card) |
Yes
|
Yes
| Yes
|
|
Mobile App access for Android or iOS |
Yes
|
Yes
| Yes
|
Frequently Asked Questions
Is there a yearly subscription to use the software?
Nope!
We have a one time license price, then it's yours to use on that version forever. For example, if you purchase your license when S6 is the current version, you can use any version of S6 in the future at no additional cost.
When each new Major Version is released (like S7), there is a $29.95 cost if you would like to be able to use all iterations of that new version.
I have the free Basic license. What are my options for tech support?
We have extensive documentation and guides available for our free Basic license users!
Support through our help desk and our phone lines is reserved for customers with a paid license.
What's the difference between a License Level Upgrade & Major Release Upgrade?
A License Level Upgrade means you're ready to unlock more features and move from Basic to either Advanced or Pro, or upgrade an Advanced license to Pro.
A Major Release Upgrade upgrade keeps you at the same license level features (Basic, Advanced, Pro), but gives you access to the latest software version, like moving from S5 to S6, or S6 to S7.
When you purchase a License Level Upgrade, we give you a Major Release Upgrade at no additional cost!
Can I make my own light shows?
Yes! Every license level allows you to create real shows for real lights.
If music and creativity isn't your favorite aspect of having a show, we have an always-growing Sequence Store for your convenience.
What is a Unit ID? How many Unit IDs are used per controller?
- Residential CTB16PC (Traditional Lights) = 1 Unit ID
- Pro Series LOR160x (Traditional Lights) = 1 Unit ID
- CMB24D Dumb RGB Controller = 1 Unit ID
- Pixie2 Smart Pixel Controller = 2 Unit IDs
- Pixie4 Smart Pixel Controller = 4 Unit IDs
- Pixie8 Smart Pixel Controller = 8 Unit IDs
- Pixie16 Smart Pixel Controller = 16 Unit IDs
- Aurora Core Smart Pixel Controller = 16+ DMX Universes
Unit IDs and DIP Switches
Each controller needs a unique Unit ID. Set it using the 8 DIP switches on the back of the unit. Find your desired ID in the table. The switch columns show which switches should be ON (1) or OFF (0). Use the jump buttons above the table to go to a specific ID range.
| LOR ID | Switches 1–4 | Switches 5–8 |
|---|---|---|
| 01 | 0000 | 0001 |
| 02 | 0000 | 0010 |
| 03 | 0000 | 0011 |
| 04 | 0000 | 0100 |
| 05 | 0000 | 0101 |
| 06 | 0000 | 0110 |
| 07 | 0000 | 0111 |
| 08 | 0000 | 1000 |
| 09 | 0000 | 1001 |
| 0A | 0000 | 1010 |
| 0B | 0000 | 1011 |
| 0C | 0000 | 1100 |
| 0D | 0000 | 1101 |
| 0E | 0000 | 1110 |
| 0F | 0000 | 1111 |
| 10 | 0001 | 0000 |
| LOR ID | Switches 1–4 | Switches 5–8 |
|---|---|---|
| 11 | 0001 | 0001 |
| 12 | 0001 | 0010 |
| 13 | 0001 | 0011 |
| 14 | 0001 | 0100 |
| 15 | 0001 | 0101 |
| 16 | 0001 | 0110 |
| 17 | 0001 | 0111 |
| 18 | 0001 | 1000 |
| 19 | 0001 | 1001 |
| 1A | 0001 | 1010 |
| 1B | 0001 | 1011 |
| 1C | 0001 | 1100 |
| 1D | 0001 | 1101 |
| 1E | 0001 | 1110 |
| 1F | 0001 | 1111 |
| 20 | 0010 | 0000 |
| LOR ID | Switches 1–4 | Switches 5–8 |
|---|---|---|
| 21 | 0010 | 0001 |
| 22 | 0010 | 0010 |
| 23 | 0010 | 0011 |
| 24 | 0010 | 0100 |
| 25 | 0010 | 0101 |
| 26 | 0010 | 0110 |
| 27 | 0010 | 0111 |
| 28 | 0010 | 1000 |
| 29 | 0010 | 1001 |
| 2A | 0010 | 1010 |
| 2B | 0010 | 1011 |
| 2C | 0010 | 1100 |
| 2D | 0010 | 1101 |
| 2E | 0010 | 1110 |
| 2F | 0010 | 1111 |
| 30 | 0011 | 0000 |
| LOR ID | Switches 1–4 | Switches 5–8 |
|---|---|---|
| 31 | 0011 | 0001 |
| 32 | 0011 | 0010 |
| 33 | 0011 | 0011 |
| 34 | 0011 | 0100 |
| 35 | 0011 | 0101 |
| 36 | 0011 | 0110 |
| 37 | 0011 | 0111 |
| 38 | 0011 | 1000 |
| 39 | 0011 | 1001 |
| 3A | 0011 | 1010 |
| 3B | 0011 | 1011 |
| 3C | 0011 | 1100 |
| 3D | 0011 | 1101 |
| 3E | 0011 | 1110 |
| 3F | 0011 | 1111 |
| 40 | 0100 | 0000 |
| LOR ID | Switches 1–4 | Switches 5–8 |
|---|---|---|
| 41 | 0100 | 0001 |
| 42 | 0100 | 0010 |
| 43 | 0100 | 0011 |
| 44 | 0100 | 0100 |
| 45 | 0100 | 0101 |
| 46 | 0100 | 0110 |
| 47 | 0100 | 0111 |
| 48 | 0100 | 1000 |
| 49 | 0100 | 1001 |
| 4A | 0100 | 1010 |
| 4B | 0100 | 1011 |
| 4C | 0100 | 1100 |
| 4D | 0100 | 1101 |
| 4E | 0100 | 1110 |
| 4F | 0100 | 1111 |
| 50 | 0101 | 0000 |
| LOR ID | Switches 1–4 | Switches 5–8 |
|---|---|---|
| 51 | 0101 | 0001 |
| 52 | 0101 | 0010 |
| 53 | 0101 | 0011 |
| 54 | 0101 | 0100 |
| 55 | 0101 | 0101 |
| 56 | 0101 | 0110 |
| 57 | 0101 | 0111 |
| 58 | 0101 | 1000 |
| 59 | 0101 | 1001 |
| 5A | 0101 | 1010 |
| 5B | 0101 | 1011 |
| 5C | 0101 | 1100 |
| 5D | 0101 | 1101 |
| 5E | 0101 | 1110 |
| 5F | 0101 | 1111 |
| 60 | 0110 | 0000 |
| LOR ID | Switches 1–4 | Switches 5–8 |
|---|---|---|
| 61 | 0110 | 0001 |
| 62 | 0110 | 0010 |
| 63 | 0110 | 0011 |
| 64 | 0110 | 0100 |
| 65 | 0110 | 0101 |
| 66 | 0110 | 0110 |
| 67 | 0110 | 0111 |
| 68 | 0110 | 1000 |
| 69 | 0110 | 1001 |
| 6A | 0110 | 1010 |
| 6B | 0110 | 1011 |
| 6C | 0110 | 1100 |
| 6D | 0110 | 1101 |
| 6E | 0110 | 1110 |
| 6F | 0110 | 1111 |
| 70 | 0111 | 0000 |
| LOR ID | Switches 1–4 | Switches 5–8 |
|---|---|---|
| 71 | 0111 | 0001 |
| 72 | 0111 | 0010 |
| 73 | 0111 | 0011 |
| 74 | 0111 | 0100 |
| 75 | 0111 | 0101 |
| 76 | 0111 | 0110 |
| 77 | 0111 | 0111 |
| 78 | 0111 | 1000 |
| 79 | 0111 | 1001 |
| 7A | 0111 | 1010 |
| 7B | 0111 | 1011 |
| 7C | 0111 | 1100 |
| 7D | 0111 | 1101 |
| 7E | 0111 | 1110 |
| 7F | 0111 | 1111 |
| 80 | 1000 | 0000 |
| LOR ID | Switches 1–4 | Switches 5–8 |
|---|---|---|
| 81 | 1000 | 0001 |
| 82 | 1000 | 0010 |
| 83 | 1000 | 0011 |
| 84 | 1000 | 0100 |
| 85 | 1000 | 0101 |
| 86 | 1000 | 0110 |
| 87 | 1000 | 0111 |
| 88 | 1000 | 1000 |
| 89 | 1000 | 1001 |
| 8A | 1000 | 1010 |
| 8B | 1000 | 1011 |
| 8C | 1000 | 1100 |
| 8D | 1000 | 1101 |
| 8E | 1000 | 1110 |
| 8F | 1000 | 1111 |
| 90 | 1001 | 0000 |
| LOR ID | Switches 1–4 | Switches 5–8 |
|---|---|---|
| 91 | 1001 | 0001 |
| 92 | 1001 | 0010 |
| 93 | 1001 | 0011 |
| 94 | 1001 | 0100 |
| 95 | 1001 | 0101 |
| 96 | 1001 | 0110 |
| 97 | 1001 | 0111 |
| 98 | 1001 | 1000 |
| 99 | 1001 | 1001 |
| 9A | 1001 | 1010 |
| 9B | 1001 | 1011 |
| 9C | 1001 | 1100 |
| 9D | 1001 | 1101 |
| 9E | 1001 | 1110 |
| 9F | 1001 | 1111 |
| A0 | 1010 | 0000 |
| LOR ID | Switches 1–4 | Switches 5–8 |
|---|---|---|
| A1 | 1010 | 0001 |
| A2 | 1010 | 0010 |
| A3 | 1010 | 0011 |
| A4 | 1010 | 0100 |
| A5 | 1010 | 0101 |
| A6 | 1010 | 0110 |
| A7 | 1010 | 0111 |
| A8 | 1010 | 1000 |
| A9 | 1010 | 1001 |
| AA | 1010 | 1010 |
| AB | 1010 | 1011 |
| AC | 1010 | 1100 |
| AD | 1010 | 1101 |
| AE | 1010 | 1110 |
| AF | 1010 | 1111 |
| B0 | 1011 | 0000 |
| LOR ID | Switches 1–4 | Switches 5–8 |
|---|---|---|
| B1 | 1011 | 0001 |
| B2 | 1011 | 0010 |
| B3 | 1011 | 0011 |
| B4 | 1011 | 0100 |
| B5 | 1011 | 0101 |
| B6 | 1011 | 0110 |
| B7 | 1011 | 0111 |
| B8 | 1011 | 1000 |
| B9 | 1011 | 1001 |
| BA | 1011 | 1010 |
| BB | 1011 | 1011 |
| BC | 1011 | 1100 |
| BD | 1011 | 1101 |
| BE | 1011 | 1110 |
| BF | 1011 | 1111 |
| C0 | 1100 | 0000 |
| LOR ID | Switches 1–4 | Switches 5–8 |
|---|---|---|
| C1 | 1100 | 0001 |
| C2 | 1100 | 0010 |
| C3 | 1100 | 0011 |
| C4 | 1100 | 0100 |
| C5 | 1100 | 0101 |
| C6 | 1100 | 0110 |
| C7 | 1100 | 0111 |
| C8 | 1100 | 1000 |
| C9 | 1100 | 1001 |
| CA | 1100 | 1010 |
| CB | 1100 | 1011 |
| CC | 1100 | 1100 |
| CD | 1100 | 1101 |
| CE | 1100 | 1110 |
| CF | 1100 | 1111 |
| D0 | 1101 | 0000 |
| LOR ID | Switches 1–4 | Switches 5–8 |
|---|---|---|
| D1 | 1101 | 0001 |
| D2 | 1101 | 0010 |
| D3 | 1101 | 0011 |
| D4 | 1101 | 0100 |
| D5 | 1101 | 0101 |
| D6 | 1101 | 0110 |
| D7 | 1101 | 0111 |
| D8 | 1101 | 1000 |
| D9 | 1101 | 1001 |
| DA | 1101 | 1010 |
| DB | 1101 | 1011 |
| DC | 1101 | 1100 |
| DD | 1101 | 1101 |
| DE | 1101 | 1110 |
| DF | 1101 | 1111 |
| E0 | 1110 | 0000 |
| LOR ID | Switches 1–4 | Switches 5–8 |
|---|---|---|
| E1 | 1110 | 0001 |
| E2 | 1110 | 0010 |
| E3 | 1110 | 0011 |
| E4 | 1110 | 0100 |
| E5 | 1110 | 0101 |
| E6 | 1110 | 0110 |
| E7 | 1110 | 0111 |
| E8 | 1110 | 1000 |
| E9 | 1110 | 1001 |
| EA | 1110 | 1010 |
| EB | 1110 | 1011 |
| EC | 1110 | 1100 |
| ED | 1110 | 1101 |
| EE | 1110 | 1110 |
| EF | 1110 | 1111 |
| F0 | 1111 | 0000 |
Unit IDs and DIP Switches (12 Switch)
Each controller needs a unique Unit ID. Set it using the 12 DIP switches on the back of the unit. Find your desired ID in the table. The switch columns show which switches should be ON (1) or OFF (0).
| LOR ID | Switches 1–4 | Switches 5–8 | Switches 9–12 |
|---|---|---|---|
| 01 | 0000 | 0000 | 1000 |
| 02 | 0000 | 0001 | 0000 |
| 03 | 0000 | 0001 | 1000 |
| 04 | 0000 | 0010 | 0000 |
| 05 | 0000 | 0010 | 1000 |
| 06 | 0000 | 0011 | 0000 |
| 07 | 0000 | 0011 | 1000 |
| 08 | 0000 | 0100 | 0000 |
| 09 | 0000 | 0100 | 1000 |
| 0A | 0000 | 0101 | 0000 |
| 0B | 0000 | 0101 | 1000 |
| 0C | 0000 | 0110 | 0000 |
| 0D | 0000 | 0110 | 1000 |
| 0E | 0000 | 0111 | 0000 |
| 0F | 0000 | 0111 | 1000 |
| 10 | 0000 | 1000 | 0000 |
Unit ID Configuration Comparison
Options to set Unit IDs for each device type
| Current Products | ||||
|---|---|---|---|---|
| Controller | DIP Switches | Hardware Utility | Front Panel | Other |
|
Pixie2 Smart Pixel Controller with 2 Ports |
If all DIP switches are off | |||
|
Pixie4 Smart Pixel Controller with 4 Ports |
If all DIP switches are off | |||
|
Pixie8 Smart Pixel Controller with 8 Ports |
If all DIP switches are off | |||
|
Pixie16 Smart Pixel Controller with 16 Ports |
If all DIP switches are off | |||
|
LOR 160xWg3 / CTB32LDg3 Professional series 16 channel AC controller (Metal box) |
||||
|
CTB16PCg3 Residential series 16 channel AC controller |
||||
|
CTB04PC Residential series 4 channel AC controller |
||||
|
CMB24D 24 Channel Direct Current Controller (also used for 8 dumb flood lights) |
||||
|
CMB16D 16 Channel Direct Current Controller |
Rotary dials | |||
|
50W Flood (CF50) Cosmic Color Flood 50W |
||||
|
Servodog Servo controller board |
||||
|
iDMX1000 DMX-512 bridge to Light-O-Rama data network |
||||
|
Aurora Core E1.31 smart pixel controller with 16 ports |
Uses DMX Universes, not Unit IDs | |||
| Discontinued Products | ||||
| Controller | DIP Switches | Hardware Utility | Front Panel | Other |
|
CCB-100 / CCP-100 / CCR-150 Original cosmic color smart pixel controllers |
||||
|
LOR 800Wg3 Professional series 8 channel AC controller (Metal box) |
||||
|
CTB16PC-Kit Residential 16 channel kit built controller boards. |
||||
|
CTB16 blue or green Professional series 16 channel controller board |
Rotary dials | |||
|
DIO32 Digital I/O motherboard and daughter boards |
Rotary dials | |||