
Setting the Controller Unit ID
How to make each controller unique for sequencing
Light-O-Rama controllers are connected to a data network for communications. In typical configurations, the controllers are daisy-chained so each requires a unique Unit ID. How that unique Unit ID is assigned depends on the type of controller. Here's how our most common controller families have their IDs set:
- CTB16PC = Hardware Utility Program (Connect to Computer via USB485 Adapter)
- LOR160x = Front LCD Panel on Controller
- CMB24D = 12 DIP Switches on Controller Board (see table at bottom of this page)
- Pixie Controllers = DIP Switches (Recommended), OR Hardware Utility Program/USB Adapter (only use ONE method)
- Aurora Core Controller = Webpage interface
Here's what DIP Switches look like on a Pixie Controller
For an in depth look at all of our products and how to set the IDs, see the chart below. The instruction manual for the controller is also an excellent source for how to configure your controller.
If you need the DIP switch table for Pixie Controllers, are trying to configure a CPC Package for use with an RGBPlus sequence, or the last 6 ports on your Pixie16 "aren't working:"
Click Here to Jump to the Unit ID Table and Learn How to Set a Pixie's Unit ID
Cosmic Color Bulbs/Pixels/Floods/Ribbons |
Set Unit ID via Hardware Utility |
Set Unit ID via front panel |
Set Unit ID via board DIP/rotary switches |
|
|
CCB-100 |
Cosmic Color Bulbs using latest available firmware. |
|||
|
CCP-100 |
Cosmic Color Pixels using latest available firmware. |
|||
|
CCR-150 |
Cosmic Color Ribbon using latest available firmware. |
|||
|
High-Power-RGB-Flood-50W |
Cosmic Color Flood using latest available firmware. |
|||
Pixel Controllers |
via Hardware Utility |
via front panel |
via board DIP switches |
|
|
CMB24D |
8 pixel controller board using latest available firmware. |
|||
|
PixCon16 |
16 SPI ports and 4 DMX-512 ports, each with 340 pixel addressability using latest available firmware. |
set via Advanced Configuration | ||
|
Pixie2 |
2 SPI ports, each with 100 pixel addressability using latest available firmware. |
|
||
|
Pixie4 |
4 SPI ports, each with 100 pixel addressability using latest available firmware. |
|
||
|
Pixie8 |
8 SPI ports, each with 100 pixel addressability using latest available firmware. |
|
||
|
Pixie16 |
16 SPI ports, each with 100 pixel addressability using latest available firmware. |
|
||
DC Controllers |
via Hardware Utility |
via front panel |
via board rotary dials |
|
|
CMB16D |
16 channel DC controller board using latest available firmware. |
|||
Digital I/O |
via Hardware Utility |
via front panel |
via board rotary dials |
|
|
DIO32 |
Digital I/O motherboard and daughter boards using latest available firmware. |
|||
DMX Bridge |
via Hardware Utility |
via front panel |
via board DIP/rotary switches |
|
|
idmx1000 |
DMX-512 bridge to Light-O-Rama data network using latest available firmware. |
|||
Servo Control |
via Hardware Utility |
via front panel |
via board DIP/rotary switches |
|
|
ServoDog |
ServoDog servo controller board using latest available firmware. |
|||
CTB04PC/CTB16PC Residential High Voltage AC Light Controllers |
via Hardware Utility |
via front panel |
via board DIP switches |
|
|
CTB04PC |
Residential Generation 3, 4 channel controller using latest available firmware. |
|||
|
CTB16PCg3 |
Residential Generation 3, 16 channel controller using latest available firmware. |
|||
|
CTB16PC |
Residential 16 channel V2 controller boards. |
|||
|
CTB16PC-Kit |
Residential 16 channel kit built controller boards. |
|||
CTB16/32/LOR8xx/LOR16xx Professional High Voltage AC Light Controllers |
via Hardware Utility |
via front panel |
via board rotary dials |
|
|
CTB16 blue |
Professional 16 channel blue controller V7 controller board. Latest firmware version. if your board already has firmware version 4.40 or higher then it cannot use version 4.30 or lower. |
|||
|
CTB16 green |
Professional 16 channel green controller board using latest available firmware. |
|||
|
CTB32LDg3 |
Professional Generation 3, 16 channel commercial controller board using latest available firmware. |
|||
|
LOR160x |
Professional 16 channel commercial controller (metal box) using latest available firmware. |
|||
|
LOR160xWG3 |
Professional Generation 3, 16 channel commercial controller (metal box) using latest available firmware. |
|||
|
LOR800Wg3 |
Professional Generation 3, 8 channel commercial controller for LOR800Wg3 (metal box) using latest available firmware. |
|||
See the appropriate product manual for how to set other unit IDs. The manual will also discuss what the other switches are for.
Setting the Unit ID via DIP switches on controllers with 8 Switches (Pixie16, Pixie8, Pixie4, etc)
With Pixie controllers, each port on the controller gets its own Unit ID or DMX Universe, but you only need to tell the controller what the FIRST port is assigned to, then it will automatically assign the rest. When you look for a Pixie controller in the Hardware Utility, the "name" of the controller will have the FIRST Unit ID of the Unit - remember that there are more numbers assigned to each.
Pixie2 = 2 Unit IDs/DMX Universes
Pixie4 = 4 Unit IDs/DMX Universes
Pixie8 = 8 Unit IDs/DMX Universes
Pixie16 = 16 Unit IDs/DMX Universes
We recommend setting the Unit ID of a Pixie controller using the DIP Switches located on the physical controller board (see picture below). You controller does NOT need to be connected to a computer.
Take a look at the picture below for an example Pixie8 controller set to start at Unit ID 40 (the ID our 6'6" Pixel Tree needs to start with to work with our store sequences). "ON" is up and "OFF" is down. Turning any DIP switch on means the controller's ID can no longer be set with the computer - it will revert to the Unit ID setting of the DIP switches every time its repowered. To set the Unit ID of a Pixie with your computer, ensure all DIP switches are turned OFF. It is easier to set the ID with the DIP Switches, NOT the computer. You cannot set it using both methods at once.
A common problem is that the 8th DIP switch is left in the 'on' position (which sets the Pixie start at Unit ID 01), then trying to change the Pixie to start at another ID using a computer. The ID will revert to the DIP Switch's directions (01), every time you remove power from the Pixie. Turn all DIP Switches off to set the ID with a computer, or ensure the DIP switches are at the correct number (not 01).

LOR Unit IDs include 6 additional hexadecimal assignments in every normal set of 01 through 10. This means that a Pixie16 controller with a starting ID of 01 will use the following Unit ID assignments for its 16 ports:
01, 02, 03, 04, 05, 06, 07, 08, 09, 0A, 0B, 0C, 0D, 0E, 0F, 10
NOT
01, 02, 03, 04, 05, 06, 07, 08, 09, 10, 11, 12, 13, 14, 15, 16
Your Unit ID assignments must match in both the Sequencer AND on the physical controller in order for your sequences to play. Take a look at the table below to make sure your controller's DIP switch settings are correct. a "1" means the switch should be in the "on" position and a "0" means the switch should be "off."
The Pixie controller must be disconnected from power when you change DIP Switches. If the controller is powered, the change will NOT take effect.
|
LOR ID |
Switches 1‐4 |
Switches 5-8 |
|
LOR ID |
Switches 1‐4 |
Switches 5-8 |
|
LOR ID |
Switches 1‐4 |
Switches 5-8 |
|
01 |
0000 |
0001 |
|
11 |
0001 |
0001 |
|
21 |
0010 |
0001 |
|
02 |
0000 |
0010 |
|
12 |
0001 |
0010 |
|
22 |
0010 |
0010 |
|
03 |
0000 |
0011 |
|
13 |
0001 |
0011 |
|
23 |
0010 |
0011 |
|
04 |
0000 |
0100 |
|
14 |
0001 |
0100 |
|
24 |
0010 |
0100 |
|
05 |
0000 |
0101 |
|
15 |
0001 |
0101 |
|
25 |
0010 |
0101 |
|
06 |
0000 |
0110 |
|
16 |
0001 |
0110 |
|
26 |
0010 |
0110 |
|
07 |
0000 |
0111 |
|
17 |
0001 |
0111 |
|
27 |
0010 |
0111 |
|
08 |
0000 |
1000 |
|
18 |
0001 |
1000 |
|
28 |
0010 |
1000 |
|
09 |
0000 |
1001 |
|
19 |
0001 |
1001 |
|
29 |
0010 |
1001 |
|
0A |
0000 |
1010 |
|
1A |
0001 |
1010 |
|
2A |
0010 |
1010 |
|
0B |
0000 |
1011 |
|
1B |
0001 |
1011 |
|
2B |
0010 |
1011 |
|
0C |
0000 |
1100 |
|
1C |
0001 |
1100 |
|
2C |
0010 |
1100 |
|
0D |
0000 |
1101 |
|
1D |
0001 |
1101 |
|
2D |
0010 |
1101 |
|
0E |
0000 |
1110 |
|
1E |
0001 |
1110 |
|
2E |
0010 |
1110 |
|
0F |
0000 |
1111 |
|
1F |
0001 |
1111 |
|
2F |
0010 |
1111 |
|
10 |
0001 |
0000 |
|
20 |
0010 |
0000 |
|
30 |
0011 |
0000 |
|
LOR ID |
Switches 1‐4 |
Switches 5-8 |
|
LOR ID |
Switches 1‐4 |
Switches 5-8 |
|
LOR ID |
Switches 1‐4 |
Switches 5-8 |
|
31 |
0011 |
0001 |
|
41 |
0100 |
0001 |
|
51 |
0101 |
0001 |
|
32 |
0011 |
0010 |
|
42 |
0100 |
0010 |
|
52 |
0101 |
0010 |
|
33 |
0011 |
0011 |
|
43 |
0100 |
0011 |
|
53 |
0101 |
0011 |
|
34 |
0011 |
0100 |
|
44 |
0100 |
0100 |
|
54 |
0101 |
0100 |
|
35 |
0011 |
0101 |
|
45 |
0100 |
0101 |
|
55 |
0101 |
0101 |
|
36 |
0011 |
0110 |
|
46 |
0100 |
0110 |
|
56 |
0101 |
0110 |
|
37 |
0011 |
0111 |
|
47 |
0100 |
0111 |
|
57 |
0101 |
0111 |
|
38 |
0011 |
1000 |
|
48 |
0100 |
1000 |
|
58 |
0101 |
1000 |
|
39 |
0011 |
1001 |
|
49 |
0100 |
1001 |
|
59 |
0101 |
1001 |
|
3A |
0011 |
1010 |
|
4A |
0100 |
1010 |
|
5A |
0101 |
1010 |
|
3B |
0011 |
1011 |
|
4B |
0100 |
1011 |
|
5B |
0101 |
1011 |
|
3C |
0011 |
1100 |
|
4C |
0100 |
1100 |
|
5C |
0101 |
1100 |
|
3D |
0011 |
1101 |
|
4D |
0100 |
1101 |
|
5D |
0101 |
1101 |
|
3E |
0011 |
1110 |
|
4E |
0100 |
1110 |
|
5E |
0101 |
1110 |
|
3F |
0011 |
1111 |
|
4F |
0100 |
1111 |
|
5F |
0101 |
1111 |
|
40 |
0100 |
0000 |
|
50 |
0101 |
0000 |
|
60 |
0110 |
0000 |
|
LOR ID |
Switches 1‐4 |
Switches 5-8 |
|
LOR ID |
Switches 1‐4 |
Switches 5-8 |
|
LOR ID |
Switches 1‐4 |
Switches 5-8 |
|
61 |
0110 |
0001 |
|
71 |
0111 |
0001 |
|
81 |
1000 |
0001 |
|
62 |
0110 |
0010 |
|
72 |
0111 |
0010 |
|
82 |
1000 |
0010 |
|
63 |
0110 |
0011 |
|
73 |
0111 |
0011 |
|
83 |
1000 |
0011 |
|
64 |
0110 |
0100 |
|
74 |
0111 |
0100 |
|
84 |
1000 |
0100 |
|
65 |
0110 |
0101 |
|
75 |
0111 |
0101 |
|
85 |
1000 |
0101 |
|
66 |
0110 |
0110 |
|
76 |
0111 |
0110 |
|
86 |
1000 |
0110 |
|
67 |
0110 |
0111 |
|
77 |
0111 |
0111 |
|
87 |
1000 |
0111 |
|
68 |
0110 |
1000 |
|
78 |
0111 |
1000 |
|
88 |
1000 |
1000 |
|
69 |
0110 |
1001 |
|
79 |
0111 |
1001 |
|
89 |
1000 |
1001 |
|
6A |
0110 |
1010 |
|
7A |
0111 |
1010 |
|
8A |
1000 |
1010 |
|
6B |
0110 |
1011 |
|
7B |
0111 |
1011 |
|
8B |
1000 |
1011 |
|
6C |
0110 |
1100 |
|
7C |
0111 |
1100 |
|
8C |
1000 |
1100 |
|
6D |
0110 |
1101 |
|
7D |
0111 |
1101 |
|
8D |
1000 |
1101 |
|
6E |
0110 |
1110 |
|
7E |
0111 |
1110 |
|
8E |
1000 |
1110 |
|
6F |
0110 |
1111 |
|
7F |
0111 |
1111 |
|
8F |
1000 |
1111 |
|
70 |
0111 |
0000 |
|
80 |
1000 |
0000 |
|
90 |
1001 |
0000 |
|
LOR ID |
Switches 1‐4 |
Switches 5-8 |
|
LOR ID |
Switches 1‐4 |
Switches 5-8 |
|
LOR ID |
Switches 1‐4 |
Switches 5-8 |
|
91 |
1001 |
0001 |
|
A1 |
1010 |
0001 |
|
B1 |
1011 |
0001 |
|
92 |
1001 |
0010 |
|
A2 |
1010 |
0010 |
|
B2 |
1011 |
0010 |
|
93 |
1001 |
0011 |
|
A3 |
1010 |
0011 |
|
B3 |
1011 |
0011 |
|
94 |
1001 |
0100 |
|
A4 |
1010 |
0100 |
|
B4 |
1011 |
0100 |
|
95 |
1001 |
0101 |
|
A5 |
1010 |
0101 |
|
B5 |
1011 |
0101 |
|
96 |
1001 |
0110 |
|
A6 |
1010 |
0110 |
|
B6 |
1011 |
0110 |
|
97 |
1001 |
0111 |
|
A7 |
1010 |
0111 |
|
B7 |
1011 |
0111 |
|
98 |
1001 |
1000 |
|
A8 |
1010 |
1000 |
|
B8 |
1011 |
1000 |
|
99 |
1001 |
1001 |
|
A9 |
1010 |
1001 |
|
B9 |
1011 |
1001 |
|
9A |
1001 |
1010 |
|
AA |
1010 |
1010 |
|
BA |
1011 |
1010 |
|
9B |
1001 |
1011 |
|
AB |
1010 |
1011 |
|
BB |
1011 |
1011 |
|
9C |
1001 |
1100 |
|
AC |
1010 |
1100 |
|
BC |
1011 |
1100 |
|
9D |
1001 |
1101 |
|
AD |
1010 |
1101 |
|
BD |
1011 |
1101 |
|
9E |
1001 |
1110 |
|
AE |
1010 |
1110 |
|
BE |
1011 |
1110 |
|
9F |
1001 |
1111 |
|
AF |
1010 |
1111 |
|
BF |
1011 |
1111 |
|
A0 |
1010 |
0000 |
|
B0 |
1011 |
0000 |
|
C0 |
1100 |
0000 |
|
LOR ID |
Switches 1‐4 |
Switches 5-8 |
|
LOR ID |
Switches 1‐4 |
Switches 5-8 |
LOR ID |
Switches 1‐4 |
Switches 5-8 |
|
|
C1 |
1100 |
0001 |
|
D1 |
1101 |
0001 |
E1 |
1110 |
0001 |
|
|
C2 |
1100 |
0010 |
|
D2 |
1101 |
0010 |
E2 |
1110 |
0010 |
|
|
C3 |
1100 |
0011 |
|
D3 |
1101 |
0011 |
E3 |
1110 |
0011 |
|
|
C4 |
1100 |
0100 |
|
D4 |
1101 |
0100 |
E4 |
1110 |
0100 |
|
|
C5 |
1100 |
0101 |
|
D5 |
1101 |
0101 |
E5 |
1110 |
0101 |
|
|
C6 |
1100 |
0110 |
|
D6 |
1101 |
0110 |
E6 |
1110 |
0110 |
|
|
C7 |
1100 |
0111 |
|
D7 |
1101 |
0111 |
E7 |
1110 |
0111 |
|
|
C8 |
1100 |
1000 |
|
D8 |
1101 |
1000 |
E8 |
1110 |
1000 |
|
|
C9 |
1100 |
1001 |
|
D9 |
1101 |
1001 |
E9 |
1110 |
1001 |
|
|
CA |
1100 |
1010 |
|
DA |
1101 |
1010 |
EA |
1110 |
1010 |
|
|
CB |
1100 |
1011 |
|
DB |
1101 |
1011 |
EB |
1110 |
1011 |
|
|
CC |
1100 |
1100 |
|
DC |
1101 |
1100 |
EC |
1110 |
1100 |
|
|
CD |
1100 |
1101 |
|
DD |
1101 |
1101 |
ED |
1110 |
1101 |
|
|
CE |
1100 |
1110 |
|
DE |
1101 |
1110 |
EE |
1110 |
1110 |
|
|
CF |
1100 |
1111 |
|
DF |
1101 |
1111 |
EF |
1110 |
1111 |
|
|
D0 |
1101 |
0000 |
|
E0 |
1110 |
0000 |
F0 |
1111 |
0000 |
For DMX Settings and other specifications, please reference the Pixie manual.
Setting the Unit ID via DIP switches on controllers with 12 Switches (CTB04PC, CMB24D, etc)
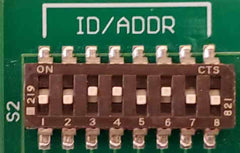
It’s easy to get intimidated setting the controller Unit ID via the little on/off switches on the circuit board. The good news is it typically only has to be done once.
The manual goes into great details on how to set all the switches. Here’s a quick example.
Locate the switches on the controller. It should look like this if the controller is set for Unit ID 02.

Look carefully and orient the controller to see the switches as shown in the above image (click the picture to make it larger if needed). On one side of the switch set there’s a marking for off/on.
ON is up
OFF is down
Each little switch is marked 1-12. Using something small like a toothpick, set the switches as needed for the Unit ID required. To make it easy, we’ve created a chart showing how to set Unit ID 01-09.
| UNIT ID | SWITCH NUMBER | |||||||||||
|---|---|---|---|---|---|---|---|---|---|---|---|---|
| 1 | 2 | 3 | 4 | 5 | 6 | 7 | 8 | 9 | 10 | 11 | 12 | |
| 01 | off | off | off | off | off | off | off | off | ON | off | off | off |
| 02 | off | off | off | off | off | off | off | ON | off | off | off | off |
| 03 | off | off | off | off | off | off | off | ON | ON | off | off | off |
| 04 | off | off | off | off | off | off | ON | off | off | off | off | off |
| 05 | off | off | off | off | off | off | ON | off | ON | off | off | off |
| 06 | off | off | off | off | off | off | ON | ON | off | off | off | off |
| 07 | off | off | off | off | off | off | ON | ON | ON | off | off | off |
| 08 | off | off | off | off | off | ON | off | off | off | off | off | off |
| 09 | off | off | off | off | off | ON | off | off | ON | off | off | off |